led night light Perfect for Bathrooms, Bedrooms and anywhere
|
LED Night Light With Sensor Battery Powered Stick Anywhere creative Wall Path Light Warm light

Feature:
*Automatic sensing: the light will activate when you get within 10 feet of it, and will shut down 15 seconds after you move out of its sensing range *Simple installation: With a detachable back plate featuring 3M adhesive pads, you can easily change the batteries and keep your light on the wall or shelf *Powered by 10, energy-saving and environment friendly LEDs *Battery Operated: requires 3 x AA batteries (not included) *You can stick it anywhere, like wall and path. Perfect for Bathrooms, Basement, Hallway, Laundry Room, Stairwells, Path, Closets Smart Motion Sensor Detection: *The Sensor Light has a built-in motion sensor that detects movement from up to 15 feet away, and it efficiently turns the light on and off depending on the light conditions. *The OxyLED T-05 identifies day and night automatically and will only illuminate at night, when movement is detected and Turns off automatically after 15 seconds if no motion is detected. The OxyLED T-05 Can also be switched to 'ON' so that the lamp is always on, and there is no auto-sensing. Slide the switch to "AUTO" to activate the sensor capability.
USB Rechargable LED Blow Control Kerosene Candle Lamp Nostalgia Retro Style Blue

*Creative vintage retro design. Adjustable brightness through the dimming knob. Energy saving, eyesight and environmental protection.
*Perfect for adding a touch of warmth and romance to the ambiance of the event. Suitbale for both indoors and outdoors activities. *Rechargeable, flameless, smokeless, safe to use. Fully charged in 1-2 hours, the lamp can light for about 10 hours. *Blow it once, the lamp will turn on. One more again, it will turn off. It's easy to control and flexible to use. A great unique gift for friends, family, students, teachers, coworkers and so on. *Package includes: 1X blowing LED kerosene lamp. 1x English user manual. 1x USB cable. three colors (red, blue, green) available.
256 colors portable USB Color Changing magic ambient led mood light Black

256 living color light changing as your intuitive, creat different atmosphere at home
Touch the color key to choose the color light you like Changes the color light automatically Low consumption , longer lifespan Built-in rechargeable Lithium battery Brightness: 150lm(equal to a 15w bulb) User friendly: You can search the color and select what you like
LED Color Change Mood Light Atmosphere Ambience Light Desk Lamp with 7 Color Changeable

Feature:
1.3pcs LED high bright flashlight. 2.Built-in rechargeable Lithium battery. 3.Top stick and lamp base are detachable. 4.Ceramic vase design colorful night light. 5.The base is also a colorful changing light and sleeping light. 6.The top part can be separately used as a torch or flashlight stick. 7.Create the romantic atmosphere in birthday instead of candles. 8.Touch the induction zone to switch on and off the torch and lamp base mood light. 9.The hand-hold torch will automatically light on once it leaves from the lamp base. 10.Product size:210mm(H)*110mm(Lamp holder Dia)*20mm(Lampstand Dia) Instructions for operation: 1. Take your product out of the package and charge it immediately for at least 15 minutes to activate it. 2. Put the product horizontally on desktop. After plugfging power adaptor, DC plug is as shown in DC outlet to charge the product. 3. When you press any part of the product downward,lampstand will give off color light and automatically switch between different colors when you pressing for the first time; when pressing for the second time, blue sleep lamp will light up at the lampstand section; press it again to turn it off. 4. Touch the touch zone(Handheld section touch function zone) for the first time when the handheld section is on the lampstand, the flashlight section will give off color light and automatically switch between; when touching it for the second time, blue sleep lamp will light up;touch it again to turn it off; When off position at lampstand is connected with external power supply, handheld section will automatically light up and switch between colors. 5.When handheld section is separated from the lampstand, touch the touch zone(Handheld section touch function zone) for the first time and the flashlight lamp in the handheld section will light up;touch it again and it will switch to color decoration lamp;touch it again and the blue sleep will light up;touch it one more time to switch it off. 6.This product has charging function. When handheld section is placed on lampstand connecting with external power supply, it will automatically charge the build-in battery in the handheld section; in normal charging,the handheld section will give off faint red light; when charging is complete,the handheld section will give off faint green light. |
2015年7月19日星期日
led night light Perfect for Bathrooms, Bedrooms and anywhere
2015年6月24日星期三
2015年6月17日星期三
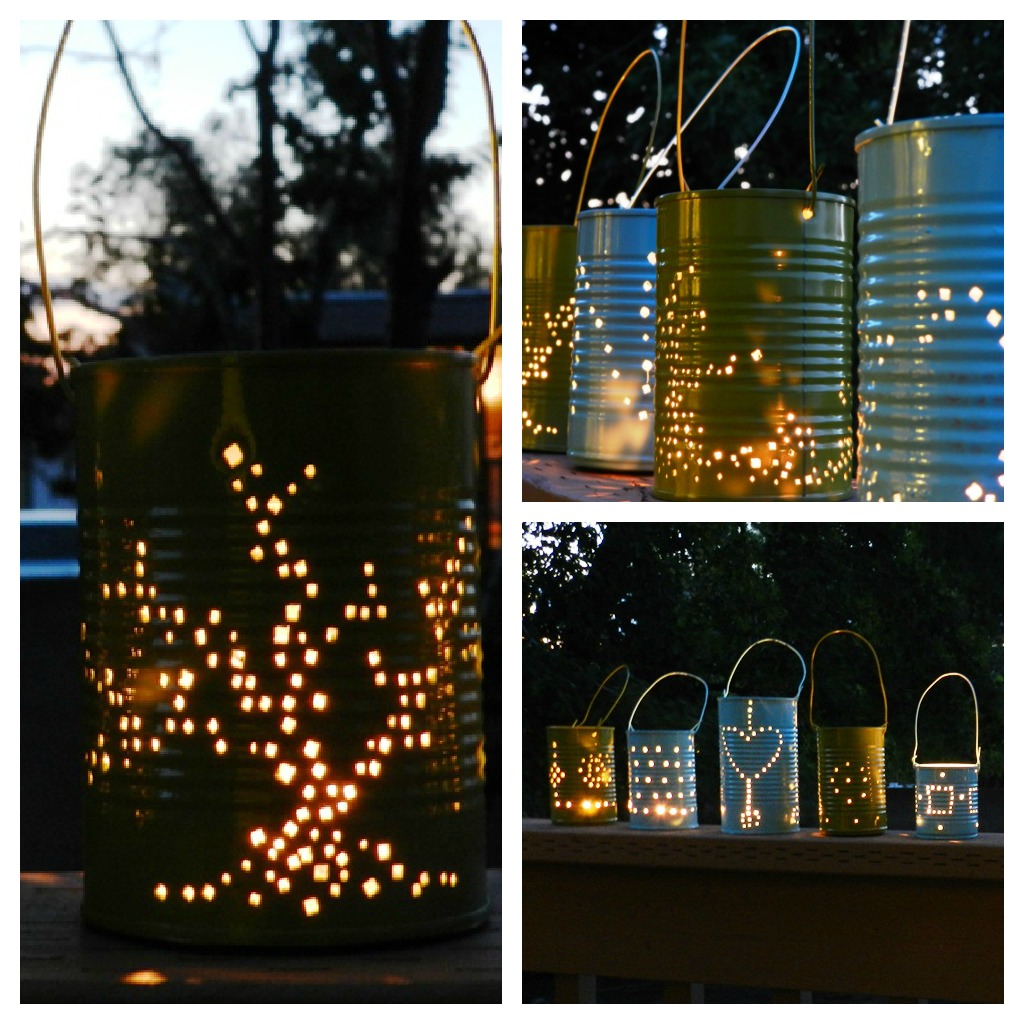
Tin Can Lanterns Tutorial
Tin Can Lanterns Tutorial
I love summer and I love that I finally have a backyard to have parties in! I made these tin can lanterns for a 4th of July party and they looked so lovely that I thought I would write a tutorial to share with you all.
So follow the tutorial below to get started making your own lanterns for your own outdoor summer party!

This tutorial is property of Elise Engh: Grow Creative (http://www.lightingole.com/) Please do not reproduce without permission! This is copyrighted material.
Materials:
recycled tin cans
hammer
nail
bailing wire
pliers
spray paint ( I used Krylon Indoor/Outdoor Paint)
tea light candle
Step 1: Remove labels and glue from the cans. I've found WD-40 to be very helpful with removing the glue.
Step 2: Fill cans with water and stick them in the freezer. Leave them in until the ice is solid. This helps the can hold its shape for the next steps.

Step 3: Take your frozen can out of the freezer. Using a hammer and nail, pound a hole near the top of the can. Flip the can over and make another hole straight across from the first hole. These will be used for the handle later on.

Step 4: Make your design. Use the hammer and nail to start punching out a design in your can. You can draw it our before hand or wing it. Either way, they turn out nicely.

Step 5: Once your design is all finished, let the ice melt out of the can and dry it out.

Step 6: Upon turning the can over, you'll notice a big bulge in the bottom. This comes from freezing water in it. But, it can be fixed! Just pound it down with a hammer so that it sits flat.

Step 7: Time to make a handle. Cut a 12 inch strip of bailing wire and curve the end of it to form a hook. Stick the hook through one of the top side holes.

Step 8: Twist the hook around to secure it. Make a hook on the other end of the wire. Stick it in the side hole on the other side and twist it around. There's your handle!

Step 9: Time for some spray paint! Paint several coats on to cover the entire outside of the can and handle.


Step 10: Once the paint is dry, insert tea light candles and light them up! You're all ready to go!
This tutorial is property of Elise Engh: Grow Creative (http://growcreative.blogspot.com/2012/07/tin-can-lanterns-tutorial.html) Please do not reproduce without permission. thank you!
 Reader Tips:
said...To keep the bottom of the can from bulging out, put 2 or 3 inches of water in the can and let that freeze, then top off the can and freeze again.
said...... avoid to make holes in the bottom inch of the can. When your candle melts and the holes are made too close to the bottom, the wax will pour out.
said...If you have a dremel tool or any kind of flexible shaft, you can use a burr or a very small metal drillbit and you will not need the ice.
said...fill your can with sand prior to adding the water and placing in the freezer! It will prevent your can from bulging during the water expansion process :0)
It’s Dollar Store Week! The Pot
It’s Dollar Store Week!The Pot!
The time has come for the final Dollar store post. *sniff* It’s one of those occasions that’s both sad and happy. Like watching a child go off to school for the first time, or eating a whole strawberry-rhubarb pie in one sitting.Mostly though, this is an exciting moment. The final Dollar store post is perhaps the most dramatic transformation ever to be recorded in history. Ever. If you don’t count some of the better drag queens.
So here we go …. deep breath … the final Dollar Store post.

clay pot


Ta da! An outdoor lantern. I’m almost positive the other shoppers in Dollarama heard something in my head *pop* when I came up with this. I was actually looking at Dollarama’s Chinese paper lanterns thinking how I liked them, but how they’d get wrecked if they were left outside in the rain for one night. Not a good thing for someone who might not be exactly, completely on top of things like bringing stuff in from the rain. Ever. Also a poor trait for someone who has a sunroof in their car. Just sayin’.
To prove that you could do this with ONLY things bought at a Dollar store I bought everything at Dollarama. You can improvise with stuff you already have at home, like chain or metal rods or whatever else you have in your basement or junk drawer. The Led lights I bought are meant for outdoors and are thusly waterproof, so pay attention to that if you go shopping around to do this.
So here we go … it’s simple enough to do but here are the instructions just in case you need ‘em:

remove the chain from your really ugly cat plaque. it is now your choice as to whether you would like to display your really ugly cat plaque or throw it in the garbage.

slip a thin metal rod through chain ends. i used a hex key i bought at dollarama. wind elastic band around ends to keep chain from slipping off. hook led light into middle.

put light and rod inside pot. pull chain through drain hole in pot. the rod acts as a brace to keep everything in place. this way you can also easily remove the light for when you need to change the batteries.

this is what it will look like inside the upside down pot.

this is what it will look like outside at night. i put mine on the fence outside my dining room window so i can see them when i’m inside at night.
And guess what?!! You can do this with just about anything! I used plastic pots, clay pots and woven baskets. With a little screwing around with your materials and technique whatever you want or find should work. For example:


This one is done a little differently:

remove the chain from your still ugly cat plaque.

turn your basket upside down, slip chain through weave and tie ends of chain together with fishing line.

cut a long thread of fishing line and loop through hooks on back of LED bulbs,

run fishing line that’s looped around light through weave in bottom of basket so it comes out other side.

grab ahold of your fishing line that you’ve run through what is now the top of your basket (shade).

pull the fishing line so it lifts the led light right up to the top of the basket. tie the fishing line into a tight knot, then cut the ends off.

see? the light is nice and snug against the top of the shade. i’m kindda shocked i just used the word “snug”. that’s an old person word.

hang your fancy new basket lamp on the bracket.

or even better! hang 2 fancy basket lamps on brackets!

ready for a party! that i’ll never have. which is o.k. this way i don’t have to clean up before or after the party. yet i still get to enjoy the lamps. and cheesies if i want. win, win really.
Total cost for each of these outdoor lanterns? About $5. I ate more money in snacks while making them. Curse you Smartfood.
This concludes my very first Dollar store series. If my brain doesn’t explode I’ll have another series for you in a while. If my brain doesn’t explode. Probably eating more Smartfood would help with preventing that.
NEW 28 Outdoor Lighting DIYs To Brighten Up Your Summer

Canning Jar Lights

I recently got a new table for my back yard that was passed down from a friend of the families, who made it prior to passing away last year. I put the table in the back yard and soon after my children begged to have dinner out there, I realized I needed some light! I saw an idea similar to this in the Pottery barn magazine using Milk bottles and decided to make my own spin. Definitely not Pottery Barn material but, I was happy. This is where I got the blue fingers.
Steps:
1. Purchased 5 indoor/outdoor light cords at Ikea for $7

2. found a case of 12 Kern Mason jars in the larger size at Walmart for $9

3. Used a large drill bit that would cut about a half dollar sized whole in the medal cap of the jar. Cut holes in 5 jar lids. i'll be honest, hubby did this part.

4. Found translucent outdoor glass paint at Michaels in a green/gold color and painted the outside of a few jars, $7. I did a bright blue also and it didn't look the way I wanted so I don't think I will go with that. I liked the green because it reminded me of the antique canning jars that were made this color

5. I screwed about 5 jars to the cord fixtures and hung them above my table. I had to play with the placement as to doing more of a tight bunch of lights or more of a grape cluster. Get the hubby to hang them from a plant hook and attach an extension cord to a socket for power. Turn on and be wowed.

Cute right? well, I liked my low budget creation anyway. I'm thinking of taking fabric to make a cozy to hide the cords or something.

订阅:
博文 (Atom)